Thursday, March 21, 2013

Braised Baby Back Ribs with Dates and Red Wine 紅酒蜜棗燉肋排


Here I'd like to recommend a Chinese food blog that inspires me a lot: 慵懶生活‧好好生活 by 貓兒. 
I learned many dishes, including this one I'm gonna write about, from her blog and her book. 她的部落格很溫馨, 她的文字輕快易懂, 平實 舒服~ I started following her blog before she became famous, had a cookbook published and began giving occasional lessons and demo.

A lot of bloggers become very commercialized and fake after gaining fame. 貓兒 (Lazy Cat) remains the same. She is as friendly and down to earth as ever. Her blog style is still heartwarming and unpretentious~ :)

Now back to this Braised Baby Back Ribs with Dates. The picture I took really doesn't do its justice. This is a delightful meat dish of which I have been missing the flavor ever since I first made it last month. It is adapted from French bistro cuisine, so bread such as baguette would be a great compliment to this main dish. I actually served it with brown rice the first night and with bread the next day. I enjoyed the dish both ways, but maybe because I am Asian. If you're used to having Western/ European dishes with bread, then you'd better stick to that option.


Braised Baby Back Ribs with Dates and Red Wine 紅酒蜜棗燉肋排
(Serves 2- 3 people)
adapted from Lazy Cat's 法式蜜棗燉肋排


Ingredients:

8-10 pieces of Baby Back Ribs (long strips of the meaty pork short ribs)
22 pitted dates, julienned, then soaked in red wine till just submerged for 30 minutes. Reserve the red wine for cooking.
60g bacon, julienned
1 onion, sliced
salt and pepper
vegetable oil

Sauce:

1 1/2 Cups red wine
1 Cup water
4- 6 Tbsp tomato paste
3 tsp Dijion mustard
1 1/2 Tbsp sugar
salt and pepper

Directions:

- Heat up some vegetable oil in a pan over medium heat. Pan fry the pork ribs on both sides to brown them. Remove from the pan and set aside.
- Cook bacon in the pan til some oil comes out, and add sliced onion. Stir fry until onion softens and turns translucent. Transfer into a deeper soup pot.
- Place the pork ribs in the pot with cooked bacon and onion. Add dates, red wine and water. Bring to boil, then simmer over low heat with lid covering 80% of the pot.
- Cook for about an hour til liquid dries out a bit and meat becomes tender.
- Stir in the rest of the sauce ingredients. Season with salt and pepper to taste.
- Simmer for another 20 minutes or so til the sauce thickens.
- Serve on plate with some fresh herbs as garnishment.

 Enjoy!! It's so Good that you won't get enough of it~

Sweet Yam Bake 蕃薯燒


這個蕃薯燒很香純. 其實食材和做法都很簡單. 基本上就是地瓜 + 奶油蛋糖鮮奶油 + 一點點鹽提味. 萊姆酒和面粉可以選擇性使用. 食材 比例上也不一定要很精確. 大致上符合就可. 在製作過程中可以按照個人喜好調整.幾乎零失敗的健康點心!


Sweet Yam Bake 蕃薯燒

Ingredients:

600g yam, skinned
2 egg yolks (save 1Tbsp for brushing)
35g unsalted butter
2-3 Tbsp heavy cream
30g sugar
2 tsp Rum
pinch of salt
30g flour
Toasted black sesame for garnish

Directions:

- Preheat the oven to 350 degrees F
- Chop the skinned yam in chunk, steam till it softens. Test by inserting a fork into yam, flipping the yam chunks and steam again if needed.
- Drain the excess water and mash the yam chunks with a fork.
- Mix in the rest of the ingredients (butter, sugar, egg yolks, heavy cream, rum, flour and salt).
- If you think the mixture is too wet, transfer it into a pot and cook till it turns to a drier paste.
  (I didn't)
- Spray the molds with some cooking oil. Distribute the yam mixture into the molds.
  (or you can use tart shells or ramekins as molds, so there's no need for unmolding later)
- Brush the top with some beat egg yolk, and garnish with some black sesame.
- Bake in the oven for 20 minutes or till the paste becomes firm and golden on top.
- Remove from oven and let cool before carefully unmold the Yam Bake.

This Yam Bake dessert is simple, healthy and yummy; with strong natural yam flavor and hints of buttery and rum taste.  Everyone should try making it! Easy satisfying treats~


Wednesday, March 20, 2013

Mitarashi Dango 日式醬油丸子

When I have dinner at home, I like having desserts at the end of a meal. This dessert can vary from a a piece of cake, cookies, to a cup of steamed milk with coffee, or lemon honey drink. And it doesn't have to be sweet sweet, sometimes savory sweets or a totally salty snack are just as satisfying and perfect for finishing a meal~

The savory sweet I made this time is Mitarashi Dango 日式醬油丸子~~
忽然很想念日式帶甜的醬油味!


So this sweet is a type of 'Dango' (sweet dumpling) made of both rice flour  (上新粉 or 台灣的在來米粉) and glutinous sweet rice flour (白玉粉 or 糯米粉). It is different from mochi (麻糬) or rice cake 年糕, which is purely sweet rice flour.

The ratio of rice flour to sweet rice flour can vary depends on individual's taste. Some people just make it 1 : 1. If you want dango to be more chewy, add more rice flour; if you'd like it softer and more sticky, use more sweet rice flour.

I used more rice flour this time, so the dango hardens when I put the leftovers in the fridge for the next day. I needed to microwave them to make it soft when eating. Next time I'll experiment with using more sweet rice flour.


Mitarashi Dango

Ingredients:

180g Joshinko (Rice Flour)
100g Shiratamako/mochiko (Sweet/Glutinous Rice Flour
2 tsp. sugar
1 cup (250ml) warm water
Bamboo skewers


Directions:

- Combine rice flour, sweet rice flour and sugar in a bowl.
- Pour in warm water at little at a time. Knead slowly until the dough becomes smooth.
- Knead and roll out small rice balls from the dough. I just kinda eyeball the sizes and made 28 rice balls in total. If you really care about having all rice balls to weight the same. Feel free to use the scale and divide the dough up many times to get the result.
- Bring water to boil in a pot. Cook all the rice balls in boiling water till they float on the surface, keep boiling for another minute or two.
- Remove rice balls from the pot and place them in to cold (ice) water. (I didn't use ice water)
- Drain the water. At the point you can start putting rice balls into bamboo skewers then grill them on stove top. However, I didn't have bamboo skewers on hand so I just pan fried them with a little oil in a skillet till they dried out and you can smell the fragrance of roasted rice.


Sweet Soy Sauce

1 cup water
1/4 cup soy sauce
2-3 Tbsp mirin
4 Tbsp sugar ( or to your own likeness)
1 Tbsp cornstarch (dissolved in 2 Tbsp cold water)

- Combine water, soy sauce, mirin and sugar in a sauce pan and bring to boil.
- Add cornstarch liquid and stir as it dissolves well and the sauce thickens over medium heat.
- Turn the heat of and let cool for a few minutes, it will thicken more when temperature drops.
- Spoon the sweet sauce sauce over the dango rice balls and enjoy!


I actually put the rice balls on the metal chopsticks to assimilate skewer effect for the picture purpose.

The dangos can just be served in a plate or a bowl with sauce drizzle over it~
I like it this way because I can keep adding more sauce as I go~ :P


Tuesday, March 19, 2013

Vertical Swiss Roll Cake with Mascarpone Frosting


I had been desiring to make this cake ever since I came across the images and the recipe posted by "The Sweet Art" http://www.thesweetart.com/2011/04/vertical-swiss-roll-cake.html#more
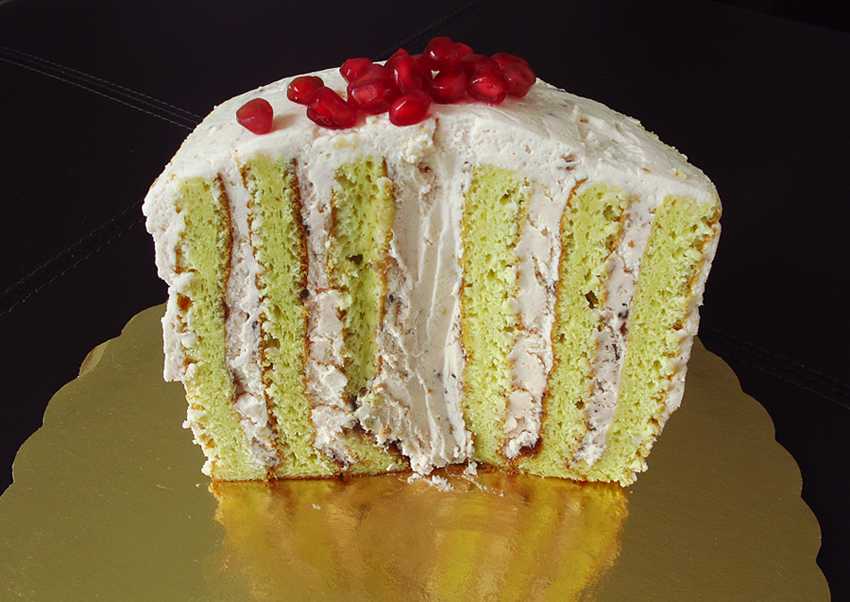
It's a beautiful cake with pink frosting over yellow cake. The ingredients and methods are simple but having the vertical layered cake just makes it look extraordinary with special visual effect.


Here I discovered a new frosting ingredient other than buttercream, whipped cream, and cream cheese --- Mascarpone cheese, which is an Italian cream cheese and the main ingredient of Tiramisu. The cake tastes light and very delicious, especially good with a hint of raspberry jam~ I could have finished the entire cake on my own..haha

This cake is a winning keeper! I look forward to using Mascarpone frosting on other cakes too~
Below is a recipe I adapted for the 10.5" x 15.5" baking sheet I have at home.

Vertical Swiss Roll Cake
(serves 6-8 people)
(I used 10.5" x 15.5" baking sheet)

Ingredients:

1 egg
4 separated eggs (egg yolks and egg whites)
1.5 tsp vanilla extract
46g butter
80g cake flour
80 whole milk ( I only have fat-free milk at home)
90g castor (superfine) sugar

Directions:

- Preheat the oven to 350 degrees F.
- Line the baking sheet with parchment paper. ( Which I forgot to do this time. However, I sprayed it with canola oil spray so fortunately the cake still came off nicely)
- Combine the egg, egg yolks, and vanilla extract in a bowl and whisk lightly.
- Melt the butter in a small pan and add cake flour to the melted butter and mix to cook through.
- Transfer the butter flour mixture to a bowl, and add the egg mixture a little at a time.
(below shows the butter flour mixture in a bowl with milk and egg yolk mixture on the side)

- Mix with a spatula into a smooth batter and add the milk.
- Strain the batter and set aside.

- Beat the egg whites in medium low speed ( such as speed 2 on a hand held electronic mixer) until foamy. Add sugar in two portions. Beat in lowest speed until egg whites turn smooth, glossy and come to stiff peaks.

- Use a spatula to fold the egg white mixture into the egg yolk batter in 3 portions. Fold carefully until just incorporated.
- Pour the batter into the lined baking sheet  and spread evenly with a spatula.
- Bake in the oven for 20-25 minutes till the cake surface is golden brown.
- Remove the cake from the pan and let it cool on wire rack before adding filling. (because I didn't line my baking sheet with parchment paper this time so I just let the cake cool in the baking sheet on the wire rack before taking the cake out.)

Filling:
Raspberry Jam
Mascarpone Frosting ( recipe below)

8oz mascarpone cheese
1.5 cups heavy whipping cream
1/2 cup powdered sugar
pinch of salt
1 tsp vanilla extract
a few drops of pink rose food coloring ( optional)

- Combine mascarpone cheese, sugar, salt and vanilla extract together.
Although in the original recipe it says you don't need a beater since the cheese is smooth, I would still use an electronic beater to mix it in the future. This time I only used a whisk and cheese clogged on it, made it not easy to work with... I guess if you had to use a hand whisk then you must have the cheese soften well enough at room temparature.

- Beat the whipping cream to stiff peaks and add a few drops of food coloring if desired.

- Fold the whipped cream into mascarpone mixture in several portions until combined. ( I didn't mix it so well this time since the cream wasn't very smooth, I was afraid it I would over mix the cream so it curdled... this is yet to be experimented more in the future)

 Assemble the Cake~
- Remove the parchment paper from the cake and place the cake with golden side down on a new parchment paper.
- Spread a thin layer of raspberry jam on the entire cooled cake, followed by a layer of mascarpone frosting.
- Cut the cake into strips of even width on the short side. ( I actually marked on the cake before spreading the filling then cut it again afterwards)  I cut my cake in two strips this time. So the finish cake looks very tall. I would cut it in 3 strips next time.

- Roll the first strip like a swiss roll cake and prop upright.


- Take the other strip and wrap it around the roll. (And do the same with remaining strips)
- Wrap the cake in parchment paper and let it chill in the refrigerator before frosting the outside.

I felt there wasn't enough frosting for me to coat the cake exterior. So next time I would double, or at least make 1.5 times more the mascarpone frosting than what recipe states.

I only had enough frosting to do a crumb coating and almost ran downstairs to get more cheese to make more frosting, then I figured I will save the money and effort for a more perfect cake next time~ There's always room for improvement and I just can't wait to have this cake for breakfast that day, so I really felt it was good enough!


I put some fresh pomegranate on top of the cake which made it look brighter and more appealing! Just like a girl without makeup but red lipstick

The cake was very yummy despite its casual appearance~ It definitely made my day! :)